Why buy a UL Listed iDevices Switch when you can potentially electrocute yourself or start a fire with a self built alternative instead?
Here’s how!
First, you must install HomeBridge on a Raspberry Pi, and configure it as a HomeKit bridge device. Instructions below.
Once you have HomeKit / HomeBridge working on your Pi and your iPhone, we can build a wireless power switch that can be controlled by Siri and the HomeKit app.
We start with a PowerTail2, and use the ESP8266 to control the on/off line.
We power the ESP8266 with a AMS1117 3.3V Power Supply Module. This brings the 5v from the charger down to the proper 3.3v that the ESP8266 needs.
We provide the power with a used cell phone charger. 110v -> 5v. This is wired directly to the ‘Line’ side of the PowerTail2 circuit board. It is always ‘Live’ or ‘Hot’ and will shock you.
We Load the code into the ESP8266 via your favorite USB/Serial converter (FTDI).
We plug it in. Homekit sees the device via the HomeBridge configuration file addition (accessory) on the Raspberry Pi.
You control the device on your iPhone, and turn electricity on and off at will.
Step 3: ESP8266 Arduino Code
/* *  This sketch demonstrates how to set up a simple HTTP-like server.

 *  The server will set a GPIO pin depending on the request

 *    http://server_ip/gpio/0 will set the GPIO0 low,

 *    http://server_ip/gpio/1 will set the GPIO0 high

 *  server_ip is the IP address of the ESP8266 module, will be

 *  printed to Serial when the module is connected.

 */
// Start the server
server.begin();
//Serial.println("Server started");
// Print the IP address
//Serial.println(WiFi.localIP());
}
void loop() {
// Check if a client has connected
WiFiClient client = server.available();
if (!client) {
return;
}
// Wait until the client sends some data
//Serial.println("new client");
while(!client.available()){
delay(1);
}
// Read the first line of the request
String req = client.readStringUntil('\r');
//Serial.println(req);
client.flush();
// Match the request
int val;
if (req.indexOf("/gpio/0") != -1)
val = 0;
else if (req.indexOf("/gpio/1") != -1)
val = 1;
else {
//Serial.println("invalid request");
client.stop();
return;
}
// Set GPIO0 according to the request
digitalWrite(0, val);
digitalWrite(LED_BUILTIN, val); // Turn the LED on (Note that LOW is the voltage level
client.flush();
// Prepare the response
String s = "HTTP/1.1 200 OK\r\nContent-Type: text/html\r\n\r\n\r\n
\r\nGPIO is now ";
s += (val)?"high":"low";
s += "
\n";
// Send the response to the client
client.print(s);
delay(10);
//Serial.println("Client disonnected");
// The client will actually be disconnected
// when the function returns and 'client' object is detroyed
}
EvilRuxpin – The Chippy Ruxpin Alternative – Hacking a Teddy Ruxpin with Next Thing Co. C.H.I.P $9 Linux Computer to Play Heavy Metal
So, I modified a Chippy Ruxpin into a more ‘evil’ form as a gift for a coworker.
1. Build a Chippy Ruxpin out of a C.H.I.P. and an old Teddy Ruxpin
2. Make it evil. Make it say random evil scary things every few minutes, and make the eyes glow red with an LED
3. Make it wifi. It is now ad-hoc so no keyboard is needed. Smartphone controllable!
4. Add DHCP server, so your smartphone can connect and pull an IP, so you can load the web gui over wifi
5. Add an 3W stereo audio amplifier. Stock ruxpin speaker + CHIP audio is kinda wimpy. DC 5V PAM8403 Audio Stereo Amplifier Board Volume Control Class D Kit Module
6. Add a big battery, maybe a 5w solar panel to charge the battery.
7. put a heavy metal t shirt on Teddy.
8. option to play stored heavy metal .mp3’s using mplayer in linux, controllable on the webgui page from a smartphone.
I chose Blackened by Metallica as the first Heavy Metal song played thru a Teddy Ruxpin ever in the history of the Earth. Yes my Teddy Ruxpin plays Metallica in stereo on command via wifi from my smartphone.
Dont’ forget to put an .mp3 file in /home/chip/Desktop/m.mp3. Obviously we are going to change this to play many many metal .mp3’s. ‘Cause that’s rad. Teddy Ruxpin Metal Beats Pill. If only I could figure out how to make the mouth/eyes move while mplayer plays an .mp3…………hmmmmmmmmmmmmmm
9. do it all as a boot script so no user input is needed after power on.
I’ve done it! (except the LED/GPIO part)
More to come! to do:
to do: integrate amazon echo hack, so that replys move the mouth and eyes of Ruxpin.
So, here are the basic steps (updates to come):
–flash CHIP with 4.3 headless. 4.4 wifi? doesn’t seem to work even if you modify the GPIO variables in the .py script.
–enable a wifi connection, apt-get update and apt-get upgrade
–install all the chippy crap from the link below
-get chippy working
–apt-get install isc-dhcp-server, again see link below
–apt-get install bc , this lets ./battery.sh work, so you can monitory your LiPo 3.7v battery from linux
–apt install wireless-tools(this step may break your normal wifi managed mode connection setup. its ad-hoc w no internet from here out, so if you want to install more software from the internet, do it before this step)
edit /etc/NetworkManager/NetworkManager.conf: wired device not managed
Most probably your interface appears in /etc/network/interfaces. By default, NetworkManager does not manage interfaces that appear in /etc/network/interfaces. You can change this behaviour.
To do this – in a terminal:
sudo nano /etc/NetworkManager/NetworkManager.conf
change the line managed=false to managed=true
Save, stop and start network manager:
sudo service network-manager restart
-configure that bitch /etc/dhcp/dhcp.conf
-configure /etc/network something/ interfaces to use 192.168.1.66 ip and dns, see links below
-configure wlan0 to always use 192.168.1.66 because we are evil
-config wlan0 as ad-hoc wifi on channel 6 see just below this
-config /etc/rc.local to do all this crap at boot, no login needed to turn on wifi and dhcp, and python script
edit /etc/network/interfaces make the ip 192.168.1.66 cause we are evil:
source-directory /etc/network/interfaces.d
auto wlan0
iface wlan0 inet static
address 192.168.1.66
netmask 255.255.255.0
gateway 192.168.1.1
edit /etc/rc.local code:
iwconfig wlan0 mode ad-hoc channel 6 essid “EvilRuxpin”
ifconfig wlan0 up 192.168.1.66
sudo service isc-dhcp-server start
cd ChippyRuxpin cause i installed under root
python /root/ChippyRuxpin/chippyRuxpin.py
after a editing /etc/rc.local, /etc/network/interfaces and /etc/dhcp/dhcp.conf, reboot.
once booted up, you should be able to connect to ad-hoc wifi “EvilRuxpin”
it should serve up a DHCP address between 192.168.1.10-20.
goto http://192.168.1.66:8080 or 80
page should load
note: my stupid dell laptop would not connect to the ad-hoc wifi, but my iphone 5s would.
# IMPORTANT NOTE ABOUT TWITTER STUFF!
# In order to retrieve tweets, you need to authorize this code to use your twitter account.
# This involves obtaining some special tokens that are specific to you.
# Please visit Twitter’s website to obtain this information and put the values in the variables below.
# For more information, visit this URL:
# https://dev.twitter.com/oauth/overview/application-owner-access-tokens
consumerKey=’INSERT YOUR CONSUMER KEY HERE FROM TWITTER’
consumerSecret=’INSERT YOUR CONSUMER SECRET HERE FROM TWITTER’
accessTokenKey=’INSERT YOUR ACCESS TOKEN KEY HERE FROM TWITTER’
accessTokenSecret=’INSERT YOUR ACCESS TOKEN SECRET HERE FROM TWITTER’
import sys
import time
import subprocess
import os
from random import randint
from threading import Thread
from chippyRuxpin_audioPlayer import AudioPlayer
from chippyRuxpin_gpio import GPIO
from chippyRuxpin_twitter import ChippyTwitter
from chippyRuxpin_webFramework import WebFramework
fullMsg = “”
MOUTH_OPEN = 408 # GPIO pin assigned to open the mouth. XIO-P0
MOUTH_CLOSE = 412 # GPIO pin assigned to close the mouth. XIO-P2
EYES_OPEN = 410 # GPIO pin assigned to open the eyes. XIO-P4
EYES_CLOSE = 414 # GPIO pin assigned to close the eyes. XIO-P6
while isRunning:
#cmd = “sudo sh -c ‘echo 1 > /sys/class/gpio/gpio412/value'”
#subprocess.Popen(cmd,shell=True, stdout=subprocess.PIPE)
time.sleep(1)
global rcount
myTextIndex = 1
rcount = rcount + 1
myTextIndex = ( randint( 0,2) )
print(myTextIndex)
print(rcount)
if rcount >= 60:
#myTextIndex == 0
if myTextIndex == 0:
myText = “hello fucker!”
elif myTextIndex == 1:
myText = “I can hear you Adam. I know you are talking about me. You don’t want to make me angry ”
elif myTextIndex == 2:
myText = “Hey! give me the pipe back”
else:
myText = ‘single quotes this is option 4’
#return MyText
rcount = 0
talk(myText)
chippyRuxpin-webFramework.py:
#!/usr/bin/env python

#

# Chippy Ruxpin by Next Thing Co 2015

# Powered by C.H.I.P., the world's first $9 computer!
from bottle import run, get, post, request, route, redirect
import socket
preset1=”Hello Adam, would you like to hear some Heavy Metal?”
preset2=”Hello Adam, would you like to hear some Heavy Metal?”
print(“web start”)
class WebFramework:
def __init__(self,func):
self.ip = [(s.connect((‘192.168.1.66’, 80)), s.getsockname()[0], s.close()) for s in [socket.socket(socket.AF_INET, socket.SOCK_DGRAM)]][0][1]
print( “———“)
print( “CHIPPY RUXPIN IS ONLINE!”)
print( “In your browser, go to ” + str(self.ip) + “:8080”)
print( “———“)
self.talkFunc = func
this part of the code does not format well in wordpress . it is: LESS THAN SYMBOL form action=”/” method=”post” GREATER THAN SYMBOL
preset11: LESS THAN SYMBOL input name=”speech” type=”text” size=”96″ value=”one of these days, _ _ _ _ I am going to kill that fucking cat'” / GREATER THAN SYMBOL
LESS THAN SYMBOL input value=”Go!” type=”submit” / GREATER THAN SYMBOL
chippyRuxpin_audioPlayer.py:
#!/usr/bin/env python

#

# Chippy Ruxpin by Next Thing Co 2015

# Powered by C.H.I.P., the world's first $9 computer!
#!/usr/bin/env python
#
import alsaaudio as aa
import audioop
from time import sleep
import struct
import math
import array
import numpy as np
import wave
import os
import subprocess
class AudioPlayer:
def __init__(self):
subprocess.Popen(‘amixer cset numid=1 100%’ ,shell=True, stdout=subprocess.PIPE ) # Set PA mixer volume to 100%
subprocess.Popen(‘amixer cset numid=2 2’ ,shell=True, stdout=subprocess.PIPE ) # Set right mixer to be “right” (2)
subprocess.Popen(‘amixer cset numid=3 1’ ,shell=True, stdout=subprocess.PIPE ) # Set left mixer to be “left” (1)
subprocess.Popen(‘amixer cset numid=4 1′ ,shell=True, stdout=subprocess.PIPE ) # Set DAC self.output to be “Direct” (2… or 1 for “Mixed” if you prefer)
self.prevAudiovalue = 0
self.mouthValue = 0
If your Windows 10 ‘Reserve’ button in Windows Updates does not do anything, or you do not have the ‘Get Windows 10’ icon or program, there is an easy way to obtain the .iso or initiate the Windows 10 installer from within Windows 7.
Just download and run the MediaCreationTool.exe. It allows you to begin upgrading to Windows 10 directly, or create a .iso or USB installer.
Sony Online Entertainment Accounts Vulnerable to Brute Force Password Reset
A few months ago I began to recieve numerous spam emails from Sony Online Entertainment. Obviously, some poor kid had typed in my email address instead of his own when signing up for the online gaming platform.
As a nice guy, I sent SOE customer service an email asking for my email address to be removed. ( I do not like being awoken by a beeping cell phone in the middle of the night). Sure, I could have just flagged the email as SPAM, and gone on with my life. But I thought the honest, correct and ‘right’ thing to do was to get this poor kids account actually corrected.
I received no response from Sony Online Entertainment Customer Service.
After being awoken several times more, my attitude for SOE turned ‘twords the unfavorable side. I thought, “why don’t these people simply respond, and why won’t they stop sending me crap when requested?”. So I attempted to have this corrected once again:
to Sony
God fucking admit you have the wrong email address stop sending me this
Sent from my iPhone
On Feb 27, 2015, at 4:40 PM, Sony Entertainment Network wrote:
Sony Entertainment
Network
Wallet Transaction Notification: Funds Added.
Dear glenn,
The requested funds have been added to your Sony Entertainment Network wallet. The transaction details are provided below for your records.
Thank you,
The Sony Entertainment Network Team
Online ID: imabad460
Order Number: 8052327724
Date Purchased 02/18/2015 @ 11:10 AM
Charge Method: MC 5516********4375
Funds Added To Wallet: $9.99
Current Wallet Amount*: $9.99
*This wallet amount is current as of the date and time of this transaction.
To update your marketing preferences, please click here.
This e-mail message has been delivered from a send-only address. Please do not reply to this message. For more information about your account, please visit the links below.
Terms of Use and Privacy Policy:
http://www.sonyentertainmentnetwork.com/legal/
“Sony Entertainment Network” and “Sony Entertainment Network Logo” are trademarks of Sony Corporation.
Again, no response. Poor ‘little imabad460. It seems SOE is not interested in fixing this problem for its customer.
Then in March of 2015, after being awoke several times again from SOE spam, I decided to call SOE customer support. The nice foreign guy at the call center did not seem to be concerned that their company was sending out spam to non customers after being asked nicely not to. He said he would send me a password reset. I told him that was the problem, please stop doing so. He then demanded my name, and I explained to him that my name is irrelevant since I am not an SOE customer. This went on and on and they said they would send a verification email to the email address in question. They did, and I responded with:
Do Not Reply do-not-reply@playstation.sony.com via rg4l6fsz62gjayab.5q95zs6dsyqcprg9.a50sj.i-h5efeac.na15.bnc.salesforce.com
Mar 18 (4 days ago)
to me
Send the email to “pscustomer_service@playstation.sony.com”
Subject line: ATTN: Sony Entertainment Network account Email Investigations, Case Number#
Body of the email: Include your name and Case number
Be sure to document in the “Case Feed” the email is being used without permission.
05183358 this is the case
ref:_00Di0H5ef._500i0MVrtu:ref
Laguna Computer
Mar 18 (4 days ago)
to pscustomer_service@playstation.sony.com
Yes I do not have a Sony account, please stop sending me emails. The account holder has used the wrong email address
Sent from my iPhone
> On Mar 18, 2015, at 12:44 PM, Do Not Reply wrote:
>
> Send the email to “pscustomer_service@playstation.sony.com”
>
> Subject line: ATTN: Sony Entertainment Network account Email Investigations, Case Number#
>
> Body of the email: Include your name and Case number
>
> Be sure to document in the “Case Feed” the email is being used without permission.
>
> 05183358 this is the case
>
>
> ref:_00Di0H5ef._500i0MVrtu:ref
Since then, I just keep receiving Account password links from Sony. So I thought to myself. “I will just fix it myself!”. I clicked on the password reset link that they sent me, and was taken to a birthdate verification page. This is where the exploit was found.
That is when I discovered that the Sony Online Entertainment password reset webpage does not timeout for failout after x amount of attempts. This is a large security hole. By my math it should take 365 dates (1-31x12months) x 40 ‘years’ (1975-2015) approx less than 15,000 attempts before the password reset is brute forced.
Weak Sauce SOE! Can’t you just remove my email address from your system as requested?
Brute Force Vulnerability in Sony Entertainment Online’s Account Password Reset Webpage
The original code is for an Arduino YUN. The YUNs have built in ethernet and some code had to be changed to get it to work with my standard Uno with an ethernet shield.
Basically i had to strip out the Console.print and the Bridge.h commands, changing them to Serial.print . Also ,I had to shift the response string lookup digits a few places, because it was offset with the original YUN code. I just copied the RESPONSE from the serial monitor into Notepad, and counted the digits by using the right arrow key, taking note to count the spaces as well.
Here is the modified code that works on an Arduino Uno with an Ethernet shield. Dont forget to get your TembooAccount.h file from the temboo site.
Also, I had issues with the header code box not populating correctly while following the instructions. Try hitting refresh, switch between Arduino YUN and Arduino code using the box at the top of the temboo website.
You will need to edit the code below to include YOUR twilio auth code and ID. This code will turn a LED on digital pin7 if you send a text as “lights on” and turn the led off if you send “lights off”
/* Setup shield-specific #include statements */

/*Use the pic above, for the header setup, my WordPress software hides the code from this part in this post */

#include

#include

#include

#include

#include

#include

#include "TembooAccount.h" // Contains Temboo account information

#include
/*REPLACE THE FIRST 10 Lines with those shown in the pic above ^ */
int numRuns = 1; // Execution count, so this doesn't run forever
int maxRuns = 5; // Maximum number of times the Choreo should be executed
int ledPin = 13; // Led for debug
int buzzerPin = 2; // buzzer's connected to pin 2
int lightsPin = 7; // The pin where your Xmas lights are connected to.
int timeToWait = 600000; //Delay between calls
String bodyMsgLast = "none"; // This variable holds the last text message read.
void setup() {
Serial.begin(9600);
// For debugging, wait until the serial console is connected.
delay(4000);
while(!Serial);
//Turn lights off on boot up
digitalWrite(lightsPin, HIGH);
delay(5000); //simulates a button press for 5 seconds
digitalWrite(lightsPin, LOW);
delay(1000);
//Bridge.begin();
//Console.begin();
}
void loop() {
if (numRuns <= maxRuns) {
Serial.println("Running GetLastMessageThatContains - Run #" + String(numRuns++));
TembooChoreo GetLastMessageThatContainsChoreo(client);
// Invoke the Temboo client
GetLastMessageThatContainsChoreo.begin();
// Set Temboo account credentials
GetLastMessageThatContainsChoreo.setAccountName(TEMBOO_ACCOUNT);
GetLastMessageThatContainsChoreo.setAppKeyName(TEMBOO_APP_KEY_NAME);
GetLastMessageThatContainsChoreo.setAppKey(TEMBOO_APP_KEY);
// Set Choreo inputs
String AuthTokenValue = "6e0aecedb5461c4ccbc7f72535c7c569";
GetLastMessageThatContainsChoreo.addInput("AuthToken", AuthTokenValue);
String FilterValue = "lights";
GetLastMessageThatContainsChoreo.addInput("Filter", FilterValue);
String AccountSIDValue = "AC25eb0f996fbe268825f00405885f6fba";
GetLastMessageThatContainsChoreo.addInput("AccountSID", AccountSIDValue);
// Set Choreo inputs
GetLastMessageThatContainsChoreo.addInput("AuthToken", " PUT YOUR TWILIO AUTH TOKEN HERE "); //Twilio Authentication Token
GetLastMessageThatContainsChoreo.addInput("Filter", "ights"); // Filter for incoming messages holding this word
GetLastMessageThatContainsChoreo.addInput("AccountSID", " PUT YOUR TWILIO ACCOUNT ID HERE "); //Twilio account ID
GetLastMessageThatContainsChoreo.addInput("ResponseMode", "simple"); //Response Mode
// Identify the Choreo to run
GetLastMessageThatContainsChoreo.setChoreo("/Library/Twilio/SMSMessages/GetLastMessageThatContains");
// Run the Choreo; when results are available, print them to serial
GetLastMessageThatContainsChoreo.run();
String bodyMsg; // This contains the whole Message
while(GetLastMessageThatContainsChoreo.available()) {
char c = GetLastMessageThatContainsChoreo.read();
Serial.print(c);
bodyMsg += c; //The characters are being fed to the bodyMsg string
}
//Serial.println(bodyMsg+ "<-- is bodyMsg" );
if (bodyMsg != bodyMsgLast) { //Only runs if this message is different than the one stored.
if (bodyMsg.substring(33, 35) == "on") { //This only works if the 17th to 19 letters are "on"".
// This works if you're seinding the message "Lights on"
// Characters before Lights on are other info from Twilio
// Turn lights on
//digitalWrite(ledPin, HIGH); //turns on debug LED
digitalWrite(lightsPin, HIGH);
//delay(800);
//digitalWrite(lightsPin, LOW); //Simulated button press for less than a second
Serial.println("Lights are on");
//tone(buzzerPin, 2000, 3000); //beeps for 3 seconds
} else if (bodyMsg.substring (33, 36) == "off") { //17 20reads "off" from a message saying "Lights off"
//digitalWrite(ledPin, LOW); //turns off debug LED
//tone(buzzerPin, 4200, 1000); //beeps
digitalWrite(lightsPin, LOW);
//delay(5000); //simulates a 5 second button press to turn the lights off
//digitalWrite(lightsPin, LOW);
//delay(1000);
Serial.println("Lights are off");
}
bodyMsgLast = bodyMsg; //Copies this message to the Last message variable
} else {
Serial.println("Identical to Last"); //if identical, do nothing.
}
Serial.println();
Serial.println("Waiting...");
delay(timeToWait); // wait a period between GetLastMessageThatContains calls
GetLastMessageThatContainsChoreo.close();
}
Serial.println("\nWaiting...\n");
delay(30000); // wait 30 seconds between GetLastMessageThatContains calls
}
TembooAccount.h
you must edit your tembooaccount.h file as well. make sure you get an up to date app key FOR YOUR APP from the temboo website.
/*

IMPORTANT NOTE about TembooAccount.h
TembooAccount.h contains your Temboo account information and must be included
alongside your sketch. To do so, make a new tab in Arduino, call it TembooAccount.h,
and copy this content into it.
*/
#define TEMBOO_ACCOUNT "lagunabeachcomputer" // Your Temboo account name
#define TEMBOO_APP_KEY_NAME "myFirstApp" // Your Temboo app key name
#define TEMBOO_APP_KEY "2761f18fae384543af4f... xxxx " // Your Temboo app key
/*
The same TembooAccount.h file settings can be used for all Temboo SDK sketches.
Keeping your account information in a separate file means you can share the
main .ino file without worrying that you forgot to delete your credentials.
*/
This DOS batch file script does everything for Bitlocker:
-Updates Group Policy and forces no logoff (we use a separate OU for computers staged to be encrypted)
-Enables the TPM
-Sets the TPM password
-Asks for USB drive letter
-Enables Bitlocker
-Backs up key to USB drive
-Backs up key to Active Directory, creates folder based on Hostname of PC
-Copies .BEK key file from USB drive to the network location of your choice (must edit)
Windows 7 Media Center MCE Losing or Changing ClearQAM Channels After Channel Scanning or Internet TV Guide Update – How to Fix
After setting up Windows Media Center with my new Hauppauge 2250 Tv Tuner Card, I had all of my HD digital TV clearQAM channels piped in from Cox coax and it was wonderful.
However after the MCE tv guide updated on the internet, my channel listing dropped some good channels and changed the listing numbers. Here is how I fixed my MCE channels and stopped Media Center from changing the channels automatically (wrong) on me.
you have to scan for channels with the network disconnected.
This will pull a ‘real, full scan’
You will want to stop the scan once a few channels show up, but not let it complete. IE stop around %45 scan complete.
now go into the channel editor in MCE and write down which frequency/channel the station is actually using such as ‘86.1’ and the detected bitrate QAM64
now repeat re-scanning/overwriting channels until you get all the ones you want written down. see my list below as an example.
now, when you plug your network back in, the internet directory info will ‘correct’ a few stations, this is actually screwing them up and overwriting actual signals with what it thinks should be there from the info in the internet lookup.
since you have written down the actual frequecies for the stations prior, you can go into the ‘add missing channels’ setup and manually add the ‘overwritten channels’
THEN YOU HAVE TO DISABLE CHANNEL UPDATING IN THE REGISTRY:
http://joelsef.blogspot.com/2011/01/clear-qam-channels-remapping-in-windows.html
*MCE windows 7 only allows up to 3 decimal places for manual channel entry. These channels had to be auto scanned by MCE for me to receive them. I was not able to manually add them due to the longer digits
more info here http://www.thegreenbutton.tv/forums/viewtopic.php?f=6&t=6069&p=73943#p73943
Major bitcoin exchange Mt Gox announced on Monday that users should soon be able to withdraw funds from their accounts amid growing tensions and a price collapse for the virtual currency.
Japan-based Mt Gox is the second-biggest bitcoin exchange in the world – representing around 18 percent of total bitcoin trade in the last week, according to Bitcoinity.org. A halt in withdrawals last weekend left customers unable to transfer their investments into U.S. dollars.
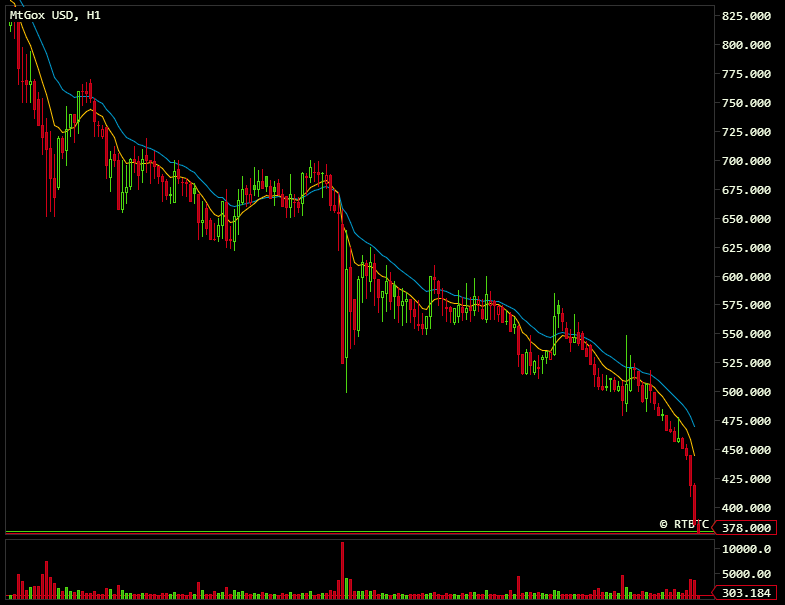
The price of the virtual currency has plunged to below $300 on the exchange in recent days, compared to a figure of around $650 on other major exchanges. Bitcoin had traded above $1,200 at its peak back in November but has since halved in price.
In a new statement on Monday Mt Gox apologized for the inconvenience caused by the recent suspension of external bitcoin transfers and said that it had implemented a workaround that should enable withdrawals and mitigate any issues.
“With this new system in place, Mt Gox should be able to resume withdrawals soon. At the beginning we will do so at a moderated pace and with new daily/monthly limits in place to prevent any problems with the new system and to take into account current market conditions,” it said in a statement on its website on Monday.
“We will update everyone again by Thursday at the latest.”
Withdrawals were halted last week as the exchange’s technical team investigated a problem with the way bitcoin withdrawals were processed. This followed several weeks of users complaining of slow withdrawal rates. Mt Gox blamed its ongoing technical issues on a critical flaw in the cryptocurrency which it said affected all exchanges.
It detailed a bug in the bitcoin software that made it possible for people to use the bitcoin network to alter transaction details. That could give the false impression that bitcoins had not been sent to a bitcoin wallet, when in fact they had.
Mt Gox caused anger in the bitcoin community when it blamed the fault on this issue — known as called “transaction malleability”. A representative from the Bitcoin Foundation, an organization that aims to promote and protect bitcoin, hit back at Mt Gox’s claims, saying that it was actually due to its highly customized software, its customer support procedures, and its unpreparedness.
This war of words continued with Mt Gox chief executive Mark Karpeles suggesting to Forbes magazine on Thursday that the flaw ought to have been solved by the Bitcoin Foundation as it has been known about since 2011.
The “Fast Money” crew reacts to tech investor Marc Andreessen’s comments on Bitcoin. And trader Brian Kelly sees promise in the digital currency.
Mt Gox has been described as the “original” bitcoin exchange by fans of the digital currency who see it as facilitating its fledgling growth in the early days of the technology. Mt Gox once claimed that it handled around 80 percent of all global dollar trades for the currency. However, the exchange hasn’t been without its own set of public relation disasters.
It recently experienced lengthy delays when exchanging bitcoin into U.S. dollars and has previously experienced high-profile DDoS (distributed denial-of-service attacks) hacking attacks which slow down its user experience. Meanwhile, the U.S. Department of Homeland Security seized its bank account in May 2013, saying it had never properly registered as a money services company.
Customers have taken to social media to express their dissatisfaction about the latest halt to trade, and bitcoin news website CoinDesk reported on Friday that a small protest had been conducted outside the offices of Mt Gox in Tokyo.
Bitcoin is a “virtual” currency that allows users to exchange online credits for goods and services. While there is no central bank that issues them, bitcoins can be created online by using a computer to complete difficult tasks, a process known as mining. Some 12 million bitcoins are believed to be in circulation, with a cap of 21 million — meaning no more bitcoins can be created after that point.
—By CNBC.com’s Matt Clinch; Follow him on Twitter @mattclinch81
Important Announcement: In order for our team to resolve the BTC withdrawal issue it is necessary for a temporary pause on all external bitcoin withdrawal requests in order to obtain a clear technical view of the current processes. We have updated our statement on this matter HERE. The MtGox trading platform, deposits, and withdrawals will perform as usual for the needs of our customers.
Dear MtGox Customers and Bitcoiners,
As you are aware, the MtGox team has been working hard to address an issue with the way that bitcoin withdrawals are processed. By “bitcoin withdrawal” we are referring to transactions from a MtGox bitcoin wallet to an external bitcoin address. Bitcoin transactions to any MtGox bitcoin address, and currency withdrawals (Yen, Euro, etc) are not affected by this issue.
The problem we have identified is not limited to MtGox, and affects all transactions where Bitcoins are being sent to a third party. We believe that the changes required for addressing this issue will be positive over the long term for the whole community. As a result we took the necessary action of suspending bitcoin withdrawals until this technical issue has been resolved.
Addressing Transaction Malleability
MtGox has detected unusual activity on its Bitcoin wallets and performed investigations during the past weeks. This confirmed the presence of transactions which need to be examined more closely.
Non-technical Explanation:
A bug in the bitcoin software makes it possible for someone to use the Bitcoin network to alter transaction details to make it seem like a sending of bitcoins to a bitcoin wallet did not occur when in fact it did occur. Since the transaction appears as if it has not proceeded correctly, the bitcoins may be resent. MtGox is working with the Bitcoin core development team and others to mitigate this issue.
Technical Explanation:
Bitcoin transactions are subject to a design issue that has been largely ignored, while known to at least a part of the Bitcoin core developers and mentioned on the BitcoinTalk forums. This defect, known as “transaction malleability” makes it possible for a third party to alter the hash of any freshly issued transaction without invalidating the signature, hence resulting in a similar transaction under a different hash. Of course only one of the two transactions can be validated. However, if the party who altered the transaction is fast enough, for example with a direct connection to different mining pools, or has even a small amount of mining power, it can easily cause the transaction hash alteration to be committed to the blockchain.
The bitcoin api “sendtoaddress” broadly used to send bitcoins to a given bitcoin address will return a transaction hash as a way to track the transaction’s insertion in the blockchain.
Most wallet and exchange services will keep a record of this said hash in order to be able to respond to users should they inquire about their transaction. It is likely that these services will assume the transaction was not sent if it doesn’t appear in the blockchain with the original hash and have currently no means to recognize the alternative transactions as theirs in an efficient way.
This means that an individual could request bitcoins from an exchange or wallet service, alter the resulting transaction’s hash before inclusion in the blockchain, then contact the issuing service while claiming the transaction did not proceed. If the alteration fails, the user can simply send the bitcoins back and try again until successful.
We believe this can be addressed by using a different hash for transaction tracking purposes. While the network will continue to use the current hash for the purpose of inclusion in each block’s Merkle Tree, the new hash’s purpose will be to track a given transaction and can be computed and indexed by hashing the exact signed string via SHA256 (in the same way transactions are currently hashed).
This new transaction hash will allow signing parties to keep track of any transaction they have signed and can easily be computed, even for past transactions.
We have discussed this solution with the Bitcoin core developers and will allow Bitcoin withdrawals again once it has been approved and standardized.
In the meantime, exchanges and wallet services – and any service sending coins directly to third parties – should be extremely careful with anyone claiming their transaction did not go through.
Note that this will also affect any other crypto-currency using the same transaction scheme as Bitcoin.
Conclusion
To put things in perspective, it’s important to remember that Bitcoin is a very new technology and still very much in its early stages. What MtGox and the Bitcoin community have experienced in the past year has been an incredible and exciting challenge, and there is still much to do to further improve.
MtGox will resume bitcoin withdrawals to outside wallets once the issue outlined above has been properly addressed in a manner that will best serve our customers.
More information on the status of this issue will be released as soon as possible.
We thank you for taking the time to read this, and especially for your patience.
Best Regards,
MtGox Team
More Bitcoin Exchanges Forced Out of Sync After Massive DDoS Attack
http://it.slashdot.org/story/14/02/12/1559233/more-bitcoin-exchanges-forced-out-of-sync-after-massive-ddos-attack
An anonymous reader tipped us to news that several Bitcoin exchanges have joined Mt Gox in suspending withdrawals after being forced out of sync with the Bitcoin network at large. After Mt Gox blamed transaction malleability for forcing them to suspend withdrawals, miscreants started flooding at least Bitpay and Btc-e with bogus transactions. Quoting the Bitcoin Foundation:
“Somebody (or several somebodies) is taking advantage of the transaction malleability issue and relaying mutated versions of transactions. This is exposing bugs in both the reference implementation and some exchange’s software. We (core dev team, developers at the exchanges, and even big mining pools) are creating workarounds and fixes right now. This is a denial-of-service attack; whoever is doing this is not stealing coins, but is succeeding in preventing some transactions from confirming. It’s important to note that DoS attacks do not affect people’s bitcoin wallets or funds. “
In our efforts to resolve the issue being encountered by various bitcoin withdrawals, it was determined that the increase in the flow of withdrawal requests has hindered our efforts on a technical level. To understand the issue thoroughly, the system needs to be in a static state.
In order for our team to resolve the withdrawal issue it is necessary for a temporarily pause on all withdrawal requests to obtain a clear technical view of the current processes.
We apologize for the sudden short notice. All bitcoin withdrawal requests will be on pause, and the withdrawals in the system will be returned to your MtGox wallet and can be reinitiated once the issue is resolved. The trading platform will perform as usual for the needs of our customers.
Our team will resolve this problem as soon as possible and will provide an update on Monday, February 10, 2014 (JST).
We deeply apologize for the inconvenience caused, and thank you for your kind support and considerations.